
Basic intro to GNU Radio -- Tune a FM station
Overview
I am trying to teach myself more about SDR. The end goal is pretty far away right now but its a very new thing to me, so that's okay.
Ever since I was a teenager I was interested in HAM, the though of talking to someone from another country was fascinating. I never did get into HAM as I moved around a lot thus making setting up stuff hard. Recently I've been reading about SDR, and a basic RTL dongle will set you back less then $40 USD delivered.
They can tune to most things including HF and the ISS! Very neat, lets start.
What you will need
I am using a RTL-SDR to handle all of my receiving tasks, they are cheap and well supported by everything, most kits come with everything you need including antennas.
later on I will take about transmitting hardware, but that is for later.
Next up I will focus on GNU Radio there are other options for SDR, some(most) are easier to use, however GNU Radio can pretty much do anything you can think of, thus I am teaching myself how to use it.
I can recommend The Hobbyist's Guide to the RTL-SDR book it helped me quite a lot.
So to follow along your going to need an RTL-SDR dongle and GNU Radio.
Hardware setup
A lot of blogs and guides gloss over this section. I was slightly annoyed by this as I could not understand how to set up my cable length and antenna height / orientation.
In hindsight it actually wont' matter for FM frequencies, they are easy to receive and any antenna will do weather that be whip or rabbit ears.... well maybe not a yagi unless you know what your doing.
So the reason its glossed over is that its not really an issue. What ever your RTL dongle comes with for an antenna, use it . For this post any antenna will work. I've included this section as I wanted to make it clear for newbies to SDR. Like myself!
Gnu Radio
GNU Radio is a huge beast of an application. I do not think its possible for me to cover all distro's and install methods.
However if your running Gentoo this is what my USE flag selection looks like:
[ebuild R ~] net-wireless/gnuradio-3.10.5.0-r2:0/3.10.5.0::gentoo USE="alsa analog audio channels digital fec filter grc modtool network qt5 uhd utils -ctrlport -doc -dtv -examples -iio -jack -oss -performance-counters -portaudio -sdl -soapy -test -trellis -vocoder -wavelet -zeromq" PYTHON_SINGLE_TARGET="python3_10 -python3_9" 0 KiBNext up launch GNU radio via gnuradio-companion command. You will be then presented with a pretty blank looking GUI!
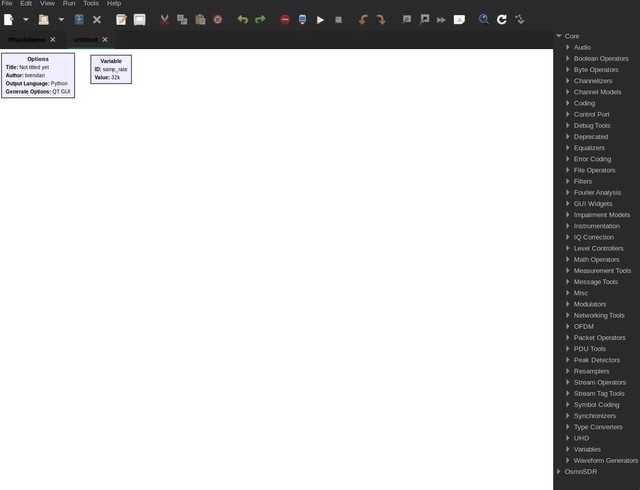
Okay so now what?
I though this was a SDR app, but looks more like MS Visio!
That is sorta close. GNU Radio works off blocks and links between them.
Your defining software blocks that intact with the signal in real time. Signal flows to and from different blocks in the GUI.
Tuning to a FM station
So looking at the above image your thinking where do I even start for something as simple as a FM station. Nothing is simple in GNU Radio, but that is also a good thing. It helps you understand and break down the signal its very much a learning tool as it is an advanced receiver.
So in the next image I have tuned to a local FM station, demodulated it and then output to my speakers and also setup a frequency GUI display to view the signal in real time.
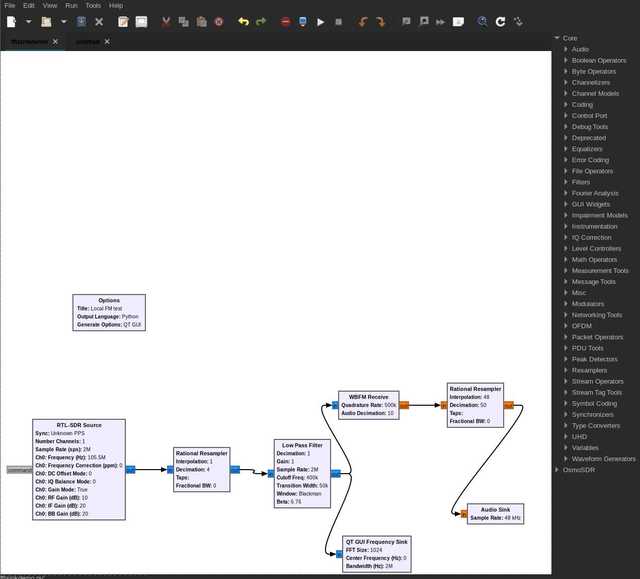
So now we can see the signal flow in GNU Radio. Lets break each segment down and explain what it does.
Each segment is referred to as a block and alters the signal or reroutes the signal.
Each block has inputs and outputs and can be chained to multiple other blocks. You can see an example of this in the Low Pass Filter , it outputs to both the WBFM Receiver and the QT GUI Frequency Sink.
WBFM, is Wide Band FM, and QT GUI is the widget framework on my GUI interface yours may be different if your using Windows.
How do I even find this block/thing?
On the right hand side of the GUI you can see a list of blocks, however there are a lot!
One handy way is to use "Ctrl-F" and you will see on the right hand side a find box appear.
Then start typing the name of block.
Once you have found it you can then drag it on to the white space area in the GUI.
Blocks
Next up we are going to discuss each block from the above image in detail.
We will work forward from the hardware block to the output blocks in the sections below.
RTL-SDR Source
This is the settings for the physical dongle, the only settings we need to worry about are:
- Sample rate -- Set this to 2 MHz by inputting 2e6 (Since GNU Radio uses scientific notation you could also input 2000000 GNU Radio will accept either)
- Frequency -- Set this to the Fm station frequency, in my case that is 105.5e6 MHz
The rest we can leave at there defaults.
Main purpose of this block is to setup our dongle in GNU Radio.
1st Rational Resampler
This is our first re-sampler. Re-samplers manipulate the signal in a given way based on the settings we give it.
We set the decimation to 4 and the interpolation to 1.
Exactly what does this mean?
- decimation -- means we give up some bandwidth to increase the ADC(Analog to Digital Converter) resolution. This is super useful as a higher resolution means less noise when we tune the dongle. Since the RTL-SDR dongle has only an 8-bit ADC this is super helpful for us. The MSPS (Maximum Samples Per Second) for the RTL is around 2 MSPS, thus via decimation it is reduced to 0.5 MSPS but with better resolution! (4/8 = 0.5)
- interpolation -- means to add samples, since our focus is on decimation we set this to the lowest value possible of 1.
Thus the goal for the first Rational re-sampler is to give us more resolution/bits out of the 8-bit ADC. However using too much decimation will cause signals to overlap.
Low Pass Filter
Next set the following two settings Cutoff Freq to 400e3 and Transition Width to 50e3.
Breaking that down:
- Cutoff Freq -- allows us to select the signal we are interested in by setting the bandwidth of a typical WBFM signal this is 200 khz, however we decimate the signal by 4 thus we need to multiple this value by 4 giving 800 khz. Keep in mind the low pass filter only acts on one side of the bandwidth, thus we need 400 khz or 400e3.
- Transition width -- this is responsible for making the signal more sharp and square like when we visualise it. Higher values here will always help but they come at the expensive of CPU cycles. Too high and you will consume all CPU cycles and drop inbound signal. I found that 50e3 is a good trade off for me on an older laptop with an i7 CPU. By all means try higher values and see what works.
The aim for this block is to be more selective on what part of the single we want to focus on. So when we send this into the next block it is able to demodulate that vs a whole range of signal data incoming.
WBFM Receive
This is really where the magic happens, this block is responsible for the demodulation of the FM signal its fed.
Set the following two settings Quadrateure Rate to 500e6 and Audio Decimation to 10.
Breaking that down:
- Quadrature Rate -- This is the sample rate the WBFM receiver expects, if you recall earlier, after decimation that is 0.5 MSPS or 500e6.
- Auto Decimation -- This is the output audio signal frequency, we decimate it by 10 thus 0.5 MSPS becomes 50 khz, a nice value to work with in out next step.
So this block has now demodulated a complex input signal and demodulated it to a simple signal we can send to auto devices.
2nd Rational Resampler
The function of this re-sampler is to take the output from the WBFM receive block and convert it to something our sound card can understand.
Set the following three settings Type to "Float(Real taps)", Interpolation to 48 and Decimation to 50.
Breaking that down:
- Type -- Float as the signal output from the WBFM block is of the type float and is a real/simple vs a complex signal type. Most audio we want to listen too will be of a simple type and most signals incoming from the dongle will be of a complex type.
- Interpolation -- 48 as we need a 48 khz frequency since that is what our sound card will accept. You could use other frequencies but that would require different resampling and 48 khz will be wide enough for most tasks when outputting audio we listen too. (Example 16 or 24 khz would also work)
- Decimation -- This is used alongside the interpolation rate. the input signal is 50 khz we decimate that by 50 to get 1000 hz then multiple that by 48 to 48 khz.
Now our signal is ready for our ears!
Audio Sink
This is what sends signal to your sound card.
The only setting we need here is the Sample Rate this should be set to 48e3 , giving us 48 khz as defined in the previous re-sampler block. This block will then send auto to your computers speakers/headphones or whatever your system is set to output too.
Listen and enjoy
Next you will need to go to the Run menu and click generate, it will ask you to save now if you have not already done this. The generate option sets up the type of code that GNU Radio needs to execute based on your flow.
This mostly ends up been either command line or GUI based code.
Once that is done you can go back to the Run menu and select execute and you should hopefully hear your FM radio station playing.
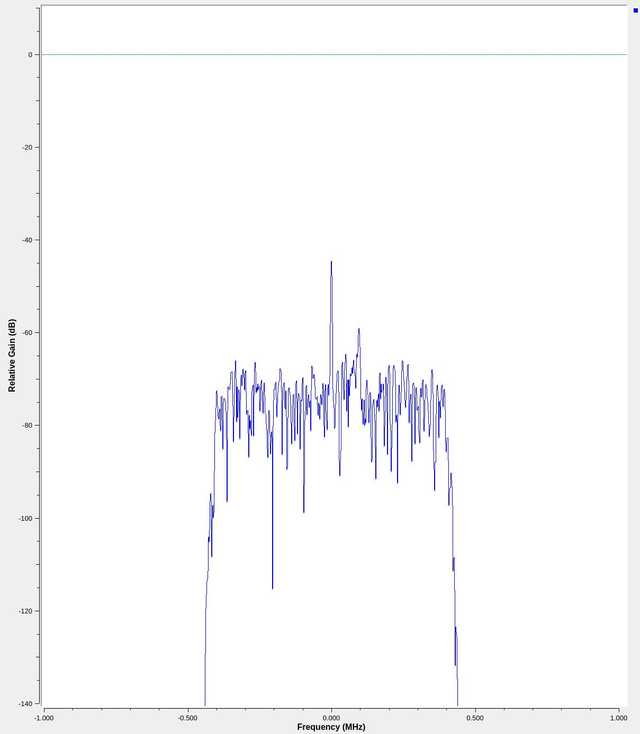
What about the QT GUI Frequency Sink ?
This is a pretty neat block. Its job is to display in real time what the frequency looks like on a graph.
The best bit about this is you can connect it to any of the output's on any of the above blocks. You can then visualise what each stage does to the signal. In the first image you can see I have it connected to the low pass filter, but you can put it anywhere. You can even input multiple signals onto one graph so that you can compare them in real time.
The only setting needed is to match the Bandwidth Hz So in our case that is the sample rate of 2e6.
You can see it action here:
Take note of the colours in the GUI
If you look at each block you can see the input and output tabs have different colours.
This represents the signal type.
In our case we have blue and orange.
- Blue is a
Complex Float 32bit - Orange is a
Simple Float 32bit
If you recall in the 2nd re-sampler section we talked about complex and real/simple signal types. The following page will help you understand them more.
This page lists all the colour types and what they represent